-->
Showing posts with label Recipes. Show all posts

Friday, July 6, 2012

Berry Delicious

Fresh berries. They’re delectable in pies, crumbles and cobblers. Simply delightful with fresh whipped cream or with my latest favorite, vanilla greek yogurt, dolloped on top. They also happen to be perfectly tasty all by themselves, freshly washed and straight out of the colander. Blueberries, blackberries, raspberries and strawberries are of course the well-known and common supermarket staple but there are a variety of others waiting to whet your pallet. Golden raspberries, boysenberries, acai berries, gogi berries and of course snozzberries if you’re familiar with Willy Wonka ;)

Not only are they tasty to eat but they’re great for you too. Packed with antioxidants and vitamins, they're also low in calories and blueberries are even considered a SUPERfood! In celebration of berries and all that is good in the world, I give you an easy and delicious berry recipe perfect for summer!

Blueberry Crisp - serves 8

Have it:
For the Filling
6 c. (3 pints) fresh blueberries
1/2 c. sugar
1 tbs. cornstarch
1 tsp. fresh lemon juice
1/4 tsp. coarse salt

For the Topping
3/4 c. all-purpose flour
1/2 c. old-fashioned rolled oats (not instant or quick-cooking)
1/2 c. chopped nuts, such as almonds
1/2 tsp. baking powder
1/2 tsp. coarse salt
6 tbs. unsalted butter, softened
1/3 c. sugar

Do it:
1. Preheat oven to 375. Make the filling by mixing the blueberries, sugar, cornstarch, lemon juice and salt in a bowl. Transfer to an 8-inch square baking dish.


2. Make the topping - in a medium bowl, stir together flour, oats, nuts, baking powder and salt. With an electric mixer (I use my KitchenAid - love it!) on medium speed, cream butter and sugar until light and fluffy. Stir flour mixture into butter. Using your hands, squeeze topping pieces together to form clumps.


3. Sprinkle topping evenly over filling. Bake until filling is bubbling in the center and topping is golden brown, about 1 hour. Transfer to a wire rack and let cool 30 minutes before serving. Enjoy alone or with ice cream or frozen yogurt (try out my new fav Atheno's frozen greek yogurt!).


Close up of the bubbly-goodness!
There you have it - a delicious and easy dessert that is low on prepwork but big on flavor! You could even do with another varietal of berry or a mix of berries. Yummers.

Source: Martha Stewart via People Magazine from her new cookbook Martha's American Food.


Monday, June 11, 2012

Drunken Gummi Bears

These are such a fun treat to make for a party or tailgate! And if it is possible, even easier than making Jell-o shots. I made these for our St. Patrick's Day party and they were quite the hit. I'm now on the lookout for other gummi treats to make drunken, tee-hee :)

Drunken Gummi Bears - makes as many as you like

Have it:
2 bags of gummi bears
Vodka
A container with lid

Do it:
1. Put gummies into bowl.

2. Cover with vodka. When I was making this I didn't have a whole lot of regular vodka left so I substituted in raspberry and I think it was a good addition! I may experiment in the future with some other flavored vodkas too.


3. Cover bowl and place overnight in the refrigerator.


4. Enjoy!


So easy to make and fun to eat! After a quick search I found some fun other new gummies to try - gummi octopus, gummi alligators, gummi hammerhead sharks, gummi lips and gummi dinosaurs. Delish!

Source: Ehow

Tuesday, May 29, 2012

Give me some s'more of those S'more Cups!

One of summer's favorite treats would have to be the gooey, chocolately concoction commonly known as the S'more. I have many a fond memory of sitting around a campfire with my cousins, roasting (and oftentimes burning) marshmallows before smooshing them between two crunchy graham crackers squares and a couple Hershey rectangles. Those sticky sandwiches are a delicasy best made over the crackling flames of a bonfire but I have come across a make-at-home S'more treat with all of the same delicious flavors in an adorable bite-size package. Behold, the S'more Cup.


S'more Cup - makes 24 cups

Have it:
7 graham cracker sheets (I used HoneyMaid Grahams and finely crushed them in my food processor)
1/4 c. powdered sugar
6 tbl. butter, melted
4 bars mil chocolate candy, divided (I used the ultimate chocolate bar, Hershey's)
12 large marshmallows

Do it:
1. Preheat oven to 350 degrees. Place graham cracker sheets into your food processor and pulse until finely crushed. If you do not own a food processor, place crackers into a large resealable plastic bag and use a meat mallet or rolling pin to finely crush.

2. Combine graham cracker crumbs, powdered sugar and butter in a small bowl.


Place 1 tbl. of the crumb mixture into a greased mini muffin pan (use Pam or other cooking spray and give a little spray in each cup). Press crumbs to form shallow cups and bake 4-5 minutes or until edges are bubbling.


3. Meanwhile, break candy bars into rectangles. Remove pan from oven; place one rectangle into each cup.


Cut marshmallows in half using a kitchen knife sprayed with Pam to avoid sticking. Place one marshmallow half, cut side down, in each cup on top of the chocolate. Return pan to oven for 2-3 minutes or until marshmallows are slightly softened. Remove pan from oven and place on cooling rack; cool 15 minutes. Carefully remove cups from pan. I used a teaspoon to help them along. Cool completely on a cooling rack.

4. Break remaining candy bars into pieces and place in a small microwavable bowl. Microwave on high in :30 second intervals stirring in between until melted. Dip the top of each marshmallow in the melted choclate. Turn top-side up and let stand 40-60 minutes or until set (if you can wait that long!). Makes 24 delish cups.


I made this crowd-pleasing delight for a party and they were scarfed down within 15 minutes! And my official taste-tester hubs was equally delighted :)

Source: Found via Pinterest over at Texas Cottage and originally from Pampered Chef


Thursday, April 14, 2011

Bean and Cheese Enchiladas with Rice

Every year during Lent we Catholics arrange our cooking schedules as we give up meat on Fridays. Often hubs and I spend Fridays out for sushi but sometimes its nice to have a home-cooked meal. Enter the meatless enchiladas and Mexican night! Not only is this a tasty recipe but it includes both the entree and the side dish. It also works for nights outside of Lent and is perfect for the vegetarians in your life.

Bean and Cheese Enchiladas with Rice - serves 8

Have it:
8 6 inch flour tortillas
1 15 oz. tomato sauce
1 tbl. ground cumin
2 tsp. paprika
1 tsp. chili powder
1/2 tsp. mexican oregano (didn't know this existed but its easy to find)
1/2 c. water
3 c. cooked white rice
1 c. chunky salsa
1/2 c. sliced black olives
1 4 oz. can sliced green chiles
1 15 oz. can refried beans
4 oz. shredded cheddar cheese (or 8 oz. for the cheese lovers)

Do it:
1. Cook the white rice according to the package directions. Preheat oven to 350.

2. In a large bowl mix together the tomato sauce, cumin, paprika, chili powder and oregano. Add to this mixture the water and cooked rice.

3. Lightly grease a 9x13 casserole dish with oil or cooking spray. Spread the rice mixture onto the bottom of the dish to cover. On each of the tortillas, spread 3 tbl. refried beans on each and sprinkle with cheese. Roll up tightly and place seam side down on top of the rice. **the original recipe suggests spreading the beans on 4 tortillas and the cheese on 4 tortillas but I thought beans AND cheese was much better.


4. Top the rolled tortillas with the salsa, black olives and chiles. I also added some cheese to the top. Bake, covered, at 350 for 45 minutes.


I love that this recipe includes the rice and the enchiladas in one dish. Everything is ready at one time and the flavors meld together deliciously. And with all of the great spices, I recommend stocking your cabinet with Penzey's Spices which happens to be where I get most of my spices and this recipe :)

Source: Penzey's One Magazine

Sunday, April 10, 2011

Ginger Pork Spring Rolls

One of my favorite cookbook series are those from America's Test Kitchen. If you're not familiar with ATK, it's a real kitchen based outside of Boston that tests and develops the best recipes, publishing cookbooks and the Cook's Country television show on public television. I love their recipes because not only are they tried and true but they give a great explanation of why a particular method or ingredient was chosen above another. I've made a variety of dishes and have loved almost all of them. My newest foray was with this Asian infusion recipe that was both easy and delicious (my two favorite words for cooking!).

Ginger-Pork Spring Rolls - serves 4

Have it:
1/4 c. hoisin sauce
1/4 c. soy sauce
2 tbl. Asian chili-garlic sauce
1/4 c. water
1 16 oz. bag coleslaw mix
1/2 c. chopped fresh cilantro
6 scallions, white parts minced, green parts sliced thin
1 tbl. vegetable oil
1 lb. ground pork
3 tbl. grated fresh ginger
12 9-inch rice paper wrappers

Do it: 1. Combine hoisin, soy, and chili-garlic sauces and water in small bowl. In another bowl, mix coleslaw, cilantro, and scallion greens.


2. Heat oil in large skillet over medium-high heat until just smoking. Add pork and 1/3 c. hoisin mixture and cook until no longer pink, about 5 minutes. Stir in ginger and scallion whites and cook until fragrant, about 1 minute. Transfer pork to bowl with coleslaw mix and toss.


3. Spread clean, damp kitchen towel on counter. Soak 4 wrappers in bowl of warm water until just pliable, about 10 seconds; spread out on towel. Arrange 1/2 c. filling on each wrapper, leaving 2-inch border at bottom. Fold in sides and roll up tightly. Repeat with remaining wrappers and filling. Serve, passing remaining hoisin mixture at table.


The dipping sauce was hubs favorite part, great flavor and could easily be used for other Asian inspired dishes.


Monday, April 4, 2011

Lemon Shrimp with Asparagus and Angel Hair

It's no secret that I love to cook. I hunt out recipes in my countless cookbooks or peruse blogs and the Food Network website to find ideas for specific food items but sometimes recipes find me. Maybe its in a magazine or on the top of an oatmeal can or on the back of a pasta box (as it was in this case). I collect these handy little recipes on 4x6 index cards in a little box. Sorted out by main ingredient or type of dish, I use these guys frequently and have made this tasty pasta dish more than once to good reviews.

Lemon Shrimp with Asparagus and Angel Hair - serves 4

Have it:
1 lb. asparagus spears, trimmed, cut into 1-in. pieces
1 tbl. extra virgin olive oil
1/2 lb. medium shrimp, peeled & deveined (I use frozen shrimp that can be thawed under cold water for fast meals)
1/2 c. chopped red pepper
1/4 teas. crushed red pepper flakes
1 c. half & half
1/2 teas. salt
2 tbl. lemon juice
2 teas. lemon zest
8 oz. angel hair pasta
1/4 c. freshly grated parmesan cheese

Do it:
1. Bring a small saucepan of water to a boil. Add asparagus; boil for 30 seconds. Drain; rinse under cold water and set aside. This is to get the cooking process started and then stop them from cooking all the way through.

2. Heat oil in large skillet over medium-high heat. Add asparagus, shrimp, red pepper and red pepper flakes; cook 5 to 7 minutes or until shrimp is cooked and vegetables are tender, stirring occasionally.


3. Reduce heat to medium-low. Stir in half & half and salt. Heat thoroughly, stirring occasionally.

4. Meanwhile, cook angel hair pasta according to package directions; drain and return to pot.

5. Add shrimp sauce to hot pasta; toss. Add lemon juice and lemon zest; toss. Transfer to serving platter; sprinkle with cheese.


Source: Barilla Pasta

Sunday, April 3, 2011

Italian Feast with Caprese Salad and Italian Sausage Soup

Let me start off by saying YUM! This one is a winner. I know this by my own tastebuds reaction but also confirmed by hubs going back for seconds and requesting I make it again before he was even done! The caprese salad is easy and fresh and the soup is great for flavor and substance. And it's an easy meal to make with the help of the handy-dandy Crock-Pot. Oh, and bread is a must for dipping!

Caprese Salad - Serves 4

Have it:
1 ripe beefsteak tomato (make sure its a good one)
4 fresh basil leaves
fresh mozzarella, sliced or buy it pre-sliced
olive oil
balsamic vinegar
salt & pepper

Do it:
1. Slice the tomatoes and mozzarella. Layer the basil leaves, tomato and mozzarella.

2. Season with salt & pepper. Mix 1 tbl. balsamic vinegar with 1 tbl. olive oil. Drizzle over the salad. Serve.


Italian Sausage Soup - Serves 4-6


Have it:
Sausage Meatballs
1 lb. Italian sausage, casings removed (I used hot sausage which added a lot of flavor)
1/2 c. dried bread crumbs
1/4 c. grated parmesan cheese
1/4 c. milk
1 egg
1/2 teas. dried basil
1/2 teas. black pepper
1/4 teas. garlic salt

Soup
4 c. hot chicken broth (I used Pacific Foods organic low-sodium broth and heated in the microwave)
1 tbl. tomato paste
1 clove garlic, minced
1/4 teas. red pepper flakes
1/2 c. mini pasta shells (you can use any tiny pasta)
1 10 oz. bag baby spinach leaves grated parmesan cheese

Do it:
1. Combine meatball ingredients. Form into marble size balls.


2. Combine broth, tomato paste, garlic and red pepper flakes in 4 1/2 quart Crock-Pot slow cooker. Add meatballs. Cover; cook on low 5 to 6 hours. So easy!


3. Thirty minutes before serving, add pasta. When pasta is tender, stir in spinach leaves. Ladle into bowls, sprinkle with parmesan cheese and serve immediately.


I love the spinach in this dish. Adding it right before serving allows it to wilt without being soggy. With there only being the two of us, we were able to have this a second day and it tasted great heated up.


Source: Crock-Pot The Original Slow Cooker Recipe Collection

Thursday, February 24, 2011

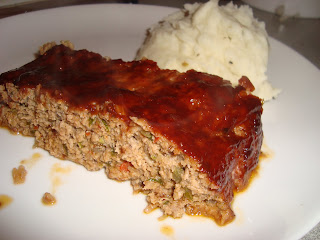
Roasted Vegetable Meatloaf with a Balsamic Syrup Glaze

This isn't the meatloaf of your grandmother's day - this delightful update takes the loaf out of the pan to keep it moist, adds a boatload of veggies and a simple, yet delicious glaze of balsamic and ketchup. Meat keeps its starring roll and the addition of the veggies really rounds out the flavor. Trust me when I say this is one of my favorite recipes and a true crowd pleaser. Served with mashed potatoes or mashed cauliflower and you've got yourself a hearty and delicious comfort food meal!

Roasted Vegetable Meat Loaf with a Balsamic Syrup Glaze - serves 6

Have it:
3 tbl. olive oil
1 large zuchinni, fine dice
1 large red pepper, fine dice
1 large green or yellow pepper, fine dice
3/4 c. button mushrooms, fine dice
1 medium yellow onion, fine dice
Salt & pepper (as needed)
2 1/2 tbl. garlic, minced or chopped fine
1/4 tsp. red pepper flakes
2 large eggs, beaten
1 tsp. fresh thyme leaves, chopped
1/4 c. fresh parsley, chopped
1 lb. ground pork
1 lb. ground chuck
1 c. panko breadcrumbs (available in the asian foods section of the grocery store)
1/2 c. romano cheese, grated or shredded (parmesan can be substituted)
1 1/2 c. ketchup, divided
1 c. +2 tbl. balsamic vinegar
(The original recipe calls for 1/2 lb. of ground pork and 1/2 lb. of ground veal but I usually just go with a lb. of ground pork and it tastes delish.)

Do it:
1. Preheat oven to 400.
2. Heat the oil in a large saute pan over high heat. Add the vegetables, salt and pepper to taste and cook till soft. Stir in garlic, red pepper flakes and cook for 1 minutes. Cool slightly. A tip for the veggies is to cute into large chunks and then use the food processor to pulse into the fine dice. When processing be careful not to over pulse, you want the veggies chopped but not pureed.

3. Whisk together the eggs and herbs in a large bowl (the largest bowl you have!). Add the meats, breadcrumbs, cheese, 1/2 c. of the ketchup, 2 tbl. of the balsamic vinegar and the vegetables, mix well. I used my hands to mix everything together and ensure a good combination. If you think you need more breadcrumbs, add a bit more.

4. Mold the meatloaf evenly on a baking sheet lined with parchment paper. Whisk the remaining ketchup and vinegar and brush on the meatloaf. Reserve some for basting the meatloaf. Bake for approx. 1 hour, checking at 45 minutes. Let rest 10 minutes before slicing.

This tasty dish came from a comfort foods cooking class and while the business is no more, the recipe sure gets a lot of use in my kitchen!
Source: Culinary Comfort Foods Class, Moveable Gourmet

Monday, June 21, 2010

Chicken Shish Kabobs with Herbs and Garlic Potato Salad

I love summer time. Great weather, long days and sunshine. What better way to cap off a beautiful Chicago day than by throwing some nosh on the grill? I can't think of one and have been enjoying a variety of grilled delights over the last couple weeks. One of the easiest and tastiest? Shish Kabobs and the ultimate summer side dish - Tater Salad. Yum, yum, and more yum...

Marinated Chicken Shish Kabobs - Serves 4 (dependent on meat/veg quantities)

Have it:
3 boneless skinless chicken breasts
1 green bell pepper
1 red bell pepper
1 orange or yellow bell pepper
12 white mushrooms
1 onion
Marinade (of your choice - I used a poultry seasoning I got from an Amish town in Indiana and some olive oil)
Bamboo Skewers

Do it:
1. Submerge 6 skewers in water and let soak at least 30 minutes.

2. Rinse and pat dry chicken breasts. Cut into 2 inch pieces and place in a medium bowl. Sprinkle or pour your desired marinade over chicken pieces and let marinate at least 30 minutes. I marinate 3-4 hours if time allows.

3. Cut peppers and onion into 2 inch pieces and set aside. Wipe mushrooms down with a damp towel. Do not wash as they will soak up the water and run the risk of becoming mushy.

4. Skewer peppers, onions, mushrooms and chicken onto the pre-soaked bamboo skewers.


5. Place on a hot grill for approx. 6 minutes, rotating halfway through cooking time.


Herbs and Garlic Potato Salad - Serves 6
Have it:
2 lbs. Yukon Gold Potatoes
1 teas. fresh garlic (1 lg. clove)
1/4 c. chopped fresh Italian parsley
2 tbl. chopped chives
1/2 c. chopped onion
1 c. mayo (I used Hellmann's Light)
1 tbl. Dijon mustard
1/2 c. chopped celery (1 lg. stalk)
1/2 teas. salt
1/2 teas. freshley ground black pepper
1 teas. dried thyme
Do it:
1. Place the potatoes (whole) in a large pot, add enough water to cover the taters, cover the pot with a lid and bring to a boil. Cook until the potatoes are pierced easily with the tip of a sharp knife, 15-20 min. Drain and let cool until you can handle them but they are still warm. Peel and cut into approc. 1-inch cubes.
2. While the taters are soaking in their hot tub, in a large bowl stir the garlic, parsley, chives, onion, mayo, Dijon mustard, celery, salt and black pepper. Crush the thyme lightly with your fingers and stir in.
3. Add the cut potatoes to the mayo mix and toss until coated. Cover and refrigerate for several hours to overnight.
Source: Potato Salad, 65 Recipes from Classic to Cool (a.k.a. my newest go-to for summer side dishes)

Set out a few candles and pour a nice cold glass of raspberry lemonade and you've got yourself one easy and delicious backyard (or for us city-dwellers, back patio) meal!

Saturday, May 29, 2010

Chicken Marsala with Fettucine

Not your mama's marsala, this recipe adds cream and employs the use of your crock-pot. I'm already starting to drool remembering how delicious this one turned out. Rich sauce, juicy chicken breast and carb heavy pasta, ahhhhhhhhh. Alright, back to the important stuff, the how and what so you can make it too. I've included the full recipe for 4 servings but I reduced everything by half except for the liquid ingredients, which I reduced by a third, so it would be appropriate for two people without leftovers.

Chicken Marsala with Fettucine - serves 4

Have it:
4 boneless, skinless chicken breasts
Salt and pepper to taste
1 tbl. vegetable oil
1 onion, chopped
1/2 c. Marsala wine (I used a wine found near the vinegar, you can find selections in the wine section as well)
2 pkg. (6 oz. ea.) sliced brown mushrooms (I used mini-portabellas)
1/2 c. chicken broth
2 teas. Worchestershire sauce
1/2 teas. salt
1/2 teas. fresh groun pepper
1/2 c. whipping cream
2 tbl. cornstarch
8 oz. cooked fettuccine
2 tbl. chopped fresh parsley

Do it:
1. Coat 4 1/2-quart Crock-Pot slow cooker with nonstick cooking spray. Season chicken with salt and pepper. Transfer to Crock-Pot slow cooker.

2. Heat oil in large skillet over medium heat until hot. Add onion. Cook and stir until translucent. Add Marsala and continue cooking 2-3 minutes or until mixture reduces slightly. Stir in mushrooms.

Add broth, Worcestershire sauce, 1/2 teas. salt and 1/2 teas. pepper. Pour mixture over chicken. Cover; cook on high 1 1/2 - 1 3/4 hours or until chicken is done. (I only cooked two pieces and checked at 1 hour, they were ready and tender at this point so I removed them.)


3. Transfer chicken to cutting board and let stand. Blend whipping cream and cornstarch until smooth. Stir into cooking liquid. Cover; cook 15 minutes longer or until mixture is thickened. Add salt and pepper, if desired. ( I cooked the noodles during this part and it worked out great!)


Honestly, this was one of the most delicous meals as of late. The chicken was unbelieveably tender and juicy. And even better, the Crock-Pot made this a great weeknight meal!

Source: Crock-Pot The Original Slow Cooker Recipe Collection

Wednesday, May 19, 2010

Stir-Fried Beef with Snap Peas

The great thing about Chicago is the unlimited array of delicious cuisine. Everywhere you turn, more food! While it's great to be able to hop in a cab and grab some grub, sometimes a long day at the office or the desire for a cozy night in leads you to the kitchen rather than the door. No need to settle for boring for a meal at home, bring the excitement to you! This easy, quick and oh-so-yum stir fry is just the ticket to spice up your weeknight meal.

Stir-Fried Beef with Snap Peas - Serves 2

Have it:
6 oz. flank steak, cut into 2-inch-wide strips with the grain, then cut across the grain into 1/8-inch-thick slices. (stick into the freezer for 15 min. before to make cutting easier)
1 tbl. soy sauce (low-sodium is good here)
2 teas. sugar
1/4 c. low-sodium chicken broth
2 tbl. oyster sauce (can find this near the asian cuisine ingredients at the grocery store)
1 tbl. dry sherry
1/2 teas. cornstarch
1 garlic clove, minced
1 1/2 teas. grated or minced fresh ginger
1 tbl. vegetable oil
6 oz. sugar snap peas (about 2 c.), ends trimmed, strings removed
1/2 red bell pepper, stemmed, seeded and sliced into 1/4-inch-wide strips
1 tbl. water

*This recipe is best served with white rice. I used an instant rice that took less than 10 minutes to cook and it was great! Make sure to time accordingly or use a rice cooker if preferred.

Do it:
1. Toss the beef with the soy sauce and 1/2 teas. of the sugar in a medium bowl and let marinate for at least 10 minutes, or up to 1 hour. In a separate bowl, whisk the remaining 1 1/2 teas. sugar, broth, oyster sauce, sherry, and cornstarch together. In another bowl, combine the garlic, ginger, and 1/2 teas. of the oil.

2. Drain the beef, discarding the marinade. Heat 1 teas. more oil in a 12-inch non-stick skillet over high heat until just smoking. Add the beef in a single layer, breaking up any clumps. Cook without stirring for 1 minute, then stir and continue to cook until the meat is browned, 1 to 2 minutes. Transfer the beef to a clean bowl.

3. Add the remaining 1 1/2 teas. oil to the skillet and heat over high heat until just smoking. Add the snap peas and bell pepper and cook, stirring often, until the vegetables are crisp-tender, about 1 minute longer.

4. Uncover and clear the center of the skillet. Add the garlic mixture to the clearing and cook, mashing the mixture into the pan, until fragrant, 15-30 seconds. Stir the garlic mixture into the vegetables.

5. Return the beef along with the accumulated juice, to the skillet and stir to combine. Whisk the broth mixture to recombine and add it to the skillet. Cook, stirring constantly, until thickened, about 30 seconds, and serve.

I've made a few different stir-fried dishes and they always make the house smell amazing! Good ventilation is key though as the smoking is part of the cooking and if you live in a small place, smoke alarms may go off :) Another variation to this meal is to cook using a wok if you have one. Ours is in storage but when I've used the wok in the past, it's increased cooking surface is great for the later steps when moving the food away from the center.

Source: America's Test Kitchen & Cook's Illustrated Cooking for Two 2009, one of my favorite cookbooks as all the meals are cut down for two people!

Tuesday, May 4, 2010

Garlicky Shrimp Pasta

Delicious yes, but do make breath mints available after this meal. Garlic breath can make converstion uncomfortable. Coming from one of my favorite sources, America's Test Kitchen, this meal is great for weeknight nosh as it's quick and easy to prepare and you most likely have all of the ingredients on hand. Use frozen shrimp and thaw by running under cold water. This saves on time and is easier on your wallet than fresh shrimp.


Garlicky Shrimp Pasta - serves 4

Have it:
5 garlic cloves, minced (about 5 teas.) plus 4 cloves, smashed (I told you it was garlicky!)
1 lb. large shrimp (21-25 count), peeled and deveined, each shrimp cut into 3 pieces
3 tbl. olive oil
1 lb. short pasta such as mezze rigatoni (love these little guys), fusilli or campanelle
1/4 - 1/2 teas. red pepper flakes
2 teas. unbleached all-purpose flour
1/2 c. dry vermouth or white wine
3/4 c. clam juice (can find near the canned tuna)
1/2 c. chopped fresh parsley
3 tbl. unsalted butter
1 teas. fresh lemon juice plus 1 lemon, cut into wedges for serving
Pepper

Do it:
1. Toss 2 teas. of the minced garlic, the shrimp, 1 tbl. of the oil, and 1/4 teas. salt in a medium bowl. Let the shrimp marinate at room temperature for 20 minutes. This can marinate as you prepare the remaining ingredients.

2. Heat the smashed garlic cloves and the remaining 2 tbl. oil in a 12-inch skillet over medium-low heat, stirring occasionally, until the garlic is light golden brown, 4-7 minutes. Remove the skillet from the heat and use a slotted spoon to remove the garlic from the skillet; discard the garlic. Set the skillet aside.

3. Bring 4 quarts water to a boil in a large Dutch oven (if you don't have a DO, you can use a large pot. However, the DO is a great tool and I would recommend investing in one.) over high heat. Add 1 tbl. salt and the pasta. Cook, stirring often, until just al dente. Drain the pasta, reserving 1/4 c. of the cooking water, and transfer the pasta back to the pot.

4. Meanwhile, return the skillet with the oil to medium heat; add the shrimp with the marinade to the skillet in a single layer. Cook the shrimp, undisturbed, until the oil starts to bubble gently, 1-2 minutes. Stir the shrimp and continue to cook until almost cooked through, about 1 minute longer. Using a slotted spoon, transfer the shrimp to a medium bowl. Add the remaining 3 teas. minced garlic and the red pepper flakes to the skillet and cook until fragrant, about 1 minute. Add the flour and cook, stirring constantly, for 1 minute. Add the clam juice and parsley; cook until mixture starts to thicken, 1-2 minutes. Off the heat, whisk in the butter and lemon juice. Add the shrimp and sauce to the pasta, adjusting the consistency with up to 1/4 c. reserved pasta cooking water. Season with pepper to taste. Serve, (in a lovely Crate & Barrel serving dish as I have) passing the lemon wedges separately.

To complete this yummy meal, serve with crunchy crostini bread and steamed asparagus to keep the meal light. Top off with a glass of your favorite white wine and wow, a flavorful meal with easy behind the scenes work for you!

Source: The Best of America's Test Kitchen Best Recipes & Reviews 2010, pick this up at your local grocery or book store in the magazine section.

Monday, April 26, 2010

My favorite Baked Artichoke-Spinach Dip (and soon to be yours as well)

Gooey. Cheesy. Delicious. Do you really need to know anything else about this dish?? Take my word for it, once you've made this one, you'll be making it forever. I've had many varieties, store-bought, restaurant variety, frozen even and none have quite the same combination of flavors. I love the bigger chunks of artichoke and spinach layered in with the cheese and served piping hot. Not only that but it's a cinch to make!


Baked Artichoke-Spinach Dip - Makes: About 3 cups

1/2 c. shredded mozzarella cheese (5 cheese Italian blend is good too)
1/2 c. dairy sour cream
1/2 c. mayo or salad dressing
(go for the real stuff for the mayo and sour cream, no fat-free)
1/2 c. grated parmesan cheese
1-2 teas. Dijon-style mustard
Dash white pepper
1 14-oz. can artichoke hearts, drained and coarsely chopped
1 c. loosely packed, coarsely chopped spinach leaves
1/2 c. finely chopped red onion (1 med.)
Pita wedges, french bread, pretzels, crackers, pita chips, etc. (the sky's the limit, anything you want to dip!)

If you're feeling fancy, look in your grocer's bakery or local bake shop for a pre-made bread bowl. Cut out the "innards" and prepare as directed. Spoon heated dish into the bowl and serve with the torn up "innards" and preferred dippers.
1. In a large bowl combine mozzarella cheese, sour cream, mayo, 1/4 c. of the parm cheese, the mustard, and pepper. Stir to combine. Stir in the artichoke hearts, spinach leaves, and onion. Spread mixture evenly into a 9-inch pie plate (doesn't have to be a pie plate. I've used au gratin dishes and square bakers as well.) Sprinkle with the remaining 1/4 c. parm cheese.

2. Bake, uncovered, in a 350 oven about 15 minutes or until heated through. Serve with preferred dipping devices.

*To make ahead of time: prepare as above through step 1. Cover and chill for up to 24 hours. Uncover and bake about 25 minutes or until heated through.

Source: Better Homes & Gardens Cookbook (Honestly, I do use other cookbooks!)

Monday, April 12, 2010

Barbecued Pulled Pork

There are some recipes that require a trip to the grocery store and then a second trip to a specialty store and substitutions because really, that spice is impossible to find. Then the shopping excursions are followed by prep work and cooking time. Whew! By the time all that work is done, you're almost too tuckered out to enjoy the fruits of your labor. Thankfully, there are great recipes that make great meals that can be made with enough time to grab a glass of wine after loading the dishwasher. This bbq pulled pork recipe is an easy Crock-Pot weeknight or Sunday game day meal for a crowd. The crucial part is allowing enough cooking time and picking a barbeque sauce you really love.

Barbecued Pulled Pork Sandwiches - Serves 8-10

Have it:
1 pork shoulder roast (about 2 1/2 lbs.) *smaller roasts will require a shorter cooking time
1 14 oz. your favorite barbecue sauce (my favorite is from a neighborhood spot, The Smoke Daddy)
1 tbl. fresh or bottled lemon juice
1 teas. brown sugar
1 medium onion, chopped
8 hamburger buns or hard rolls

Do it:
1. Place roast in 4 1/2 quart Crock-Pot slow cooker. (My pot is bigger but as long as the roast is 2 1/2 - 3 lbs. its ok). Cover; cook on Low 10-12 hours or on High 5-6 hours.

2. Remove roast from Crock-Pot slow cooker; discard cooking liquid. Shred pork with 2 forks (this is my favorite part, its so tender!).
3. Return pork to Crock-Pot slow cooker. Add barbecue sauce, lemon juice, brown sugar and onion. Cover; cook on Low 2 hours or High 1 hour. Serve shredded pork on hamburger buns or hard rolls.


Easy Roasted Potatoes - Makes 2 servings, easily doubled or tripled.
Have it:
3 medium/large red potatoes, skin on
Onion powder
Paprika
Oregano
Pepper
Salt
Garlic Powder
Thyme
1/4 cup olive oil

Do it:
1. Clean potatoes. Cut into quarters or eighths. (The smaller the size the faster they will cook.) Place into a bowl and microwave for 4-5 minutes to soften.

2. Eyeball the spices, about a 1/2 teas. of each and mix in the olive oil. Toss the potatoes in the oil and place on a baking sheet. Bake in a 400 degree oven for 20-30 minutes or until cooked through.

Enjoy! Hearty, homecooked barbecue that's easy to make. Who knew?!

Sunday, April 4, 2010

Easter Brunch

Ah, Easter. Hubs and I made a trip back to Michigan to visit my fam and I volunteered to prepare a casual Easter brunch. As there would only be 5 in attendance, light and simple it would be. Of sustenance were a Farmer's Casserole and an Overnight Coffee Cake, accompanied by a fruit salad and the traditional colored Easter eggs (I also suggest adding mimosas, I would have but the four hour drive back to Chicago put a crimp in the plan). Easy, delicious and with minimal clean-up the recipe for a relaxing brunch for you and your guests.


Farmer's Casserole - Serves 6

Have it:
Nonstick cooking spray
3 c. frozen shredded hash brown potatoes
3/4 c. - 1 c. shredded monterey jack with jalapenos or shredded cheddar cheese
1 c. diced cooked ham, Canadian-style bacon or cooked breakfast sausage
1/4 c. sliced green onion (2)
4 eggs beaten, or 1 c. refrigerated egg product (I made with Egg Beaters, very good!)
1 1/2 c. milk

Do it:
1. Coat a 2 quart square baking dish with nonstick cooking spray. Arrange hash browns evenly in the dish. Sprinkle with cheese, ham and green onion.

2. In a medium bowl combine eggs, milk, 1/8 teas. salt and 1/8 teas. black pepper. Pour egg mixture over layers in dish.

3. Bake, uncovered, in a 350 oven for 40 min or until a knife inserted near center comes out clean. Let stand 5 min before serving.


Overnight Coffee Cake - Makes 15 pieces
*As the title suggests, this is to be made ahead of time. Chill up to 24 hours.

Have it:
3 c. all-purpose flour
1 1/2 teas. baking powder
1 1/2 teas. baking soda
1 teas. salt
1 c. butter, softened
1 1/4 c. granulated sugar
3 eggs
1 15 oz. container ricotta cheese
3/4 c. chopped nuts
1/2 c. packed dark brown sugar
2 tbl. toasted wheat germ
1 tbl. ground cinnamon
1 teas. ground nutmeg


Do it:
1. Grease bottom and 1/2 inch up sides of a 13x9x2 baking pan. In a medium bowl combine flour, baking powder, baking soda and salt; set aside. In a large mixing bowl beat butter with electric mixer on medium to high speed for 30 seconds. Gradually add granulated sugar, beating until combined. Add eggs, one at a time, beating well after each addition. Beat in ricotta cheese. Beat in as much flour as you can. Stir in any remaining flour mixture with a wooden spoon. Spread the batter into the prepared pan.

2. For topping (the good stuff!), in a bowl stir together the nuts, brown sugar, wheat germ, cinnamon and nutmeg. Sprinkle evenly over batter in pan. Cover with plastic wrap. Chill in the refrigerator for up to 2 hours.

3. Bake in a 350 oven for 35 - 40 minutes or until a wooden toothpick inserted near center comes out clean. Cool cake slightly on a wire rack. Serve warm.

Source: The mecca of classic recipes, The Better Homes & Gardens New Cook Book